YUM Downgrade Basic Usage

This is quick tip, howto downgrade packages using YUM (example) on Fedora, CentOS, Red Hat (RHEL). This works simply with yum downgrade command and is very usefull when package(s) downgrade is needed some reason.

YUM Downgrade Basic Usage

Downgrade is very straightforward when package have not any dependencies, which affect the downgrade.
YUM Downgrade Single Package

[root@legion ~]#yum downgrade package

[root@legion ~]#yum downgrade thunderbird

Setting up Downgrade Process
Loading mirror speeds from cached hostfile

Resolving Dependencies
--> Running transaction check
---> Package thunderbird.x86_64 0:17.0.3-1.el6.centos will be a downgrade
---> Package thunderbird.x86_64 0:17.0.3-2.el6.centos will be erased
--> Finished Dependency Resolution

Dependencies Resolved

================================================================================
 Package           Arch         Version                     Repository     Size
================================================================================
Downgrading:
 thunderbird       x86_64       17.0.3-1.el6.centos         updates        38 M

Transaction Summary
================================================================================
Downgrade     1 Package(s)

Total download size: 38 M
Is this ok [y/N]: y
Downloading Packages:
Tagged with: , , ,
Posted in How To, Linux, One Liners

Quit Bash Shell Without Saving Bash History (5 Methods)

Sometimes it is very useful to delete / remove Bash history partially or completely when log out. Here is my favourite methods howto log out / quit / exit Bash shell without saving Bash history.

Remove Only Current Session Bash History and Leave Older History Untouched
1. Quit Bash Shell Without Saving History: Unset HISTFILE

[root@legion ~]#unset HISTFILE && exit

2. Quit Bash Shell Without Saving History: Kill Console

[root@legion ~]#kill -9 $$

Remove/Delete Bash History Completely

3. Quit Bash Shell Without Saving History: Clear History Option

[root@legion ~]#history -c && exit

4. Quit Bash Shell Without Saving History: Set HISTSIZE to 0 (zero)

[root@legion ~]#HISTSIZE=0 && exit

5. Quit Bash Shell Without Saving History: Delete HISTFILE and Unset HISTFILE

[root@legion ~]#rm -f $HISTFILE && unset HISTFILE && exit

If you want make these commands more permanent then these commands could be added on ~/.bash_logout file or used with aliases.

Tagged with: , , , , ,
Posted in How To, One Liners

Introduction to Open Source

Tagged with: , ,
Posted in One Day With Linux, Tutorials

History of Linux

Tagged with: , ,
Posted in One Day With Linux, Tutorials

Introduction to LibreOffice

Tagged with: , ,
Posted in Linux, One Day With Linux, Tutorials

Why Linux is Better than Windows………?

Tagged with: ,
Posted in One Day With Linux, Tutorials

Intro to Operating System

Tagged with: ,
Posted in One Day With Linux, Tutorials

Windows 7 as a wireless access point

On Windows 7 and later, the operating system installs a virtual device if a Hosted Network capable wireless adapter is present on the machine. This virtual device normally shows up in the “Network Connections Folder” as ‘Wireless Network Connection 2’ with a Device Name of ‘Microsoft Virtual WiFi Miniport adapter’ if the computer has a single wireless network adapter. This virtual device is used exclusively for performing software access point (SoftAP) connections . The lifetime of this virtual device is tied to the physical wireless adapter. If the physical wireless adapter is disabled, this virtual device will be removed as well.

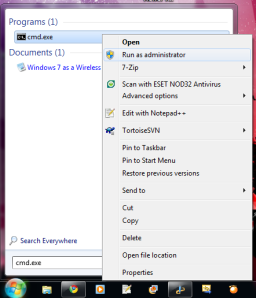
To configure it use the Command Prompt as Administrator as shown in the figure below :

vwifi_1

For the first time use only, enter these command at the command prompt

c:\Windows\system32\>netsh wlan set hostednetwork mode=allow "ssid=mynetwork" "key=mypassword" keyUsage=persistent

SSID is the public name of a wireless network.

Key is the passphrase for connecting to the network. (Make sure your key is a 8 to 63 Characters.)

This will create the required “Microsoft Virtual WiFi Miniport adapter” and also set up your hostednetwork. You may now setup Internet Connection Sharing or Network Bridging for this newly found adapter. All this is onetime setting.

We now need to start the hosted network. At the command prompt enter the following with administrator credentials :

c:\Windows\system32\>netsh wlan start hostednetwork

Open properties windows of your Mobile Broadband Connection or whatever that connect you to internet and you are done.

To disconnect enter the following command

c:\Windows\system32\>netsh wlan stop hostednetwork

At last you need to reboot  the system and start your hosted network
Tagged with: , , , , ,
Posted in Linux

HOW TO INSTALL ADOBE FLASH PLAYER PLUGIN IN CENTOS|RHEL|FEDORA

Howto install Adobe Flash Player Plugin version 11.2 (32-bit and 64-bit) with YUM on Fedora 17/16/15/14/13/12, CentOS 6.3/6.2/6.1/6/5.8
and Red Hat (RHEL) 6.3/6.2/6.1/6/5.8.
For installation via bash script, download your copy from here.
and installing yourself follow these steps..
STEP 1 : ADD ADOBE FLASH REPOSITORY RPM PACKAGE —
## Adobe Repository 32-bit x86 ##
[user@linux:~]$rpm -ivh http://linuxdownload.adobe.com/adobe-release/adobe-release-i386-1.0-1.noarch.rpm
[user@linux:~]$rpm --import /etc/pki/rpm-gpg/RPM-GPG-KEY-adobe-linux

## Adobe Repository 64-bit x86_64 ##
[user@linux:~]$rpm -ivh http://linuxdownload.adobe.com/adobe-release/adobe-release-x86_64-1.0-1.noarch.rpm
[user@linux:~]$rpm --import /etc/pki/rpm-gpg/RPM-GPG-KEY-adobe-linux
STEP 2 : UPDATE CENTOS REPOSITORY INFO —
[user@linux:~]yum check-update
STEP 4 : Install Adobe Flash Player 11.2 on Fedora 17/16/15/14/13/12, CentOS 6.3/6.2/6.1/6 and Red Hat (RHEL) 6.3/6.2/6.1/6 —
[user@linux:~]yum install flash-plugin nspluginwrapper alsa-plugins-pulseaudio libcurl
STEP 4 :Install Adobe Flash Player 11.2 on CentOS 5.8 and Red Hat (RHEL) 5.8
[user@linux:~]yum groupinstall "Sound and Video"
[user@linux:~]yum install flash-plugin nspluginwrapper curl
Tagged with: , , , , ,
Posted in Linux

HOW TO INSTALL GOOGLE CHROME IN (CENTOS/REDHAT) 6.3, FEDORA 16/17

In this I will show you how to install Google Chrome Browser in Linux ( Centos/Fedora/Redhat ).Though you can download and install the same using rpm but the best way to install and keep your browser update is via YUM. For that you have to add the google chrome repo in your repositories. For those who dont like to play around with repo and manually install software, I have written a little script which will setup and install the Google Chrome on your system while taking care of all the stuff itself.
For installation via bash script, download your copy from here.
and installing yourself follow these steps..

STEP 1 : ENABLE GOOGLE YUM  REPOSITORY —
Create a file google-chrome.repo inside the /etc/yum.repos.d :
for 32 bit —>

[user@linux:~]$vi /etc/yum.repos.d/google-chrome.repo

[google-chrome]
name=google-chrome - 32-bit
baseurl=http://dl.google.com/linux/chrome/rpm/stable/i386
enabled=1
gpgcheck=1
gpgkey=https://dl-ssl.google.com/linux/linux_signing_key.pub

for 64 bit —>

[user@linux:~]$vi /etc/yum.repos.d/google-chrome.repo

[google-chrome]
name=google-chrome - 64-bit
baseurl=http://dl.google.com/linux/chrome/rpm/stable/x86_64
enabled=1
gpgcheck=1
gpgkey=https://dl-ssl.google.com/linux/linux_signing_key.pub

Note: Both 32-bit and 64-bit repos can be placed in the same file.

STEP 2 : INSTALL GOOGLE CHROME USING YUM AS ROOT USER —

## Install Google Chrome Stable version ##
[user@linux:~]$yum install google-chrome-stable
## Install Google Chrome Beta version ##
[user@linux:~]$yum install google-chrome-beta
## Install Google Chrome Unstable version ##
[user@linux:~]$yum install google-chrome-unstable
Tagged with: , , , , , ,
Posted in Linux
  • An error has occurred; the feed is probably down. Try again later.
  • An error has occurred; the feed is probably down. Try again later.
  • An error has occurred; the feed is probably down. Try again later.